Ever wondered why some cutting jobs turn out perfectly smooth whilst others end up chipped and messy? Have you been staring at your circular saw, unsure whether you’re using the right blade for the job? Are you tired of ruining expensive tiles or struggling through concrete that seems to laugh at your efforts?
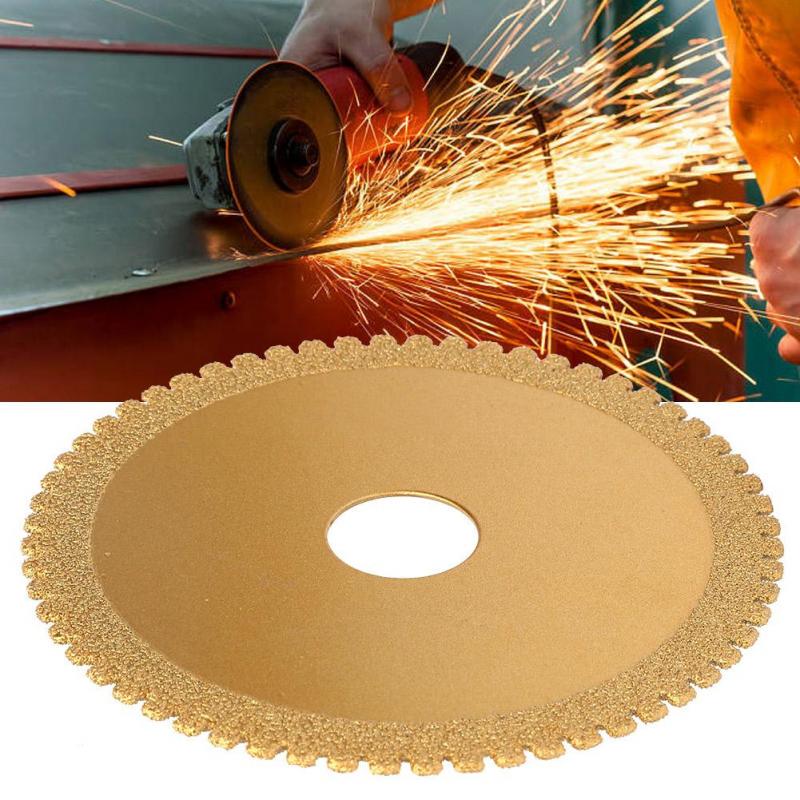
You’re not alone. Many DIY enthusiasts and even seasoned tradies find themselves confused about diamond blades and how to use them properly. These remarkable tools have revolutionised the way we cut through tough materials like concrete, stone, and ceramic tiles. Unlike standard abrasive discs that wear down quickly, diamond blades feature industrial-grade diamond segments that slice through hard materials with impressive precision.
In this guide, you’ll discover everything you need to know about selecting and installing using diamond blade for circular saw. We’ll walk through the different blade types, essential safety precautions, and cutting techniques that deliver professional results. Plus, we’ll explore the world of diamond polishing pads and how they can transform rough surfaces into stunning finishes. Whether you’re tackling a bathroom renovation or a major landscaping project, this guide will set you up for success.
Types of Diamond Blades for Different Applications
Segmented vs Continuous Rim vs Turbo Blades
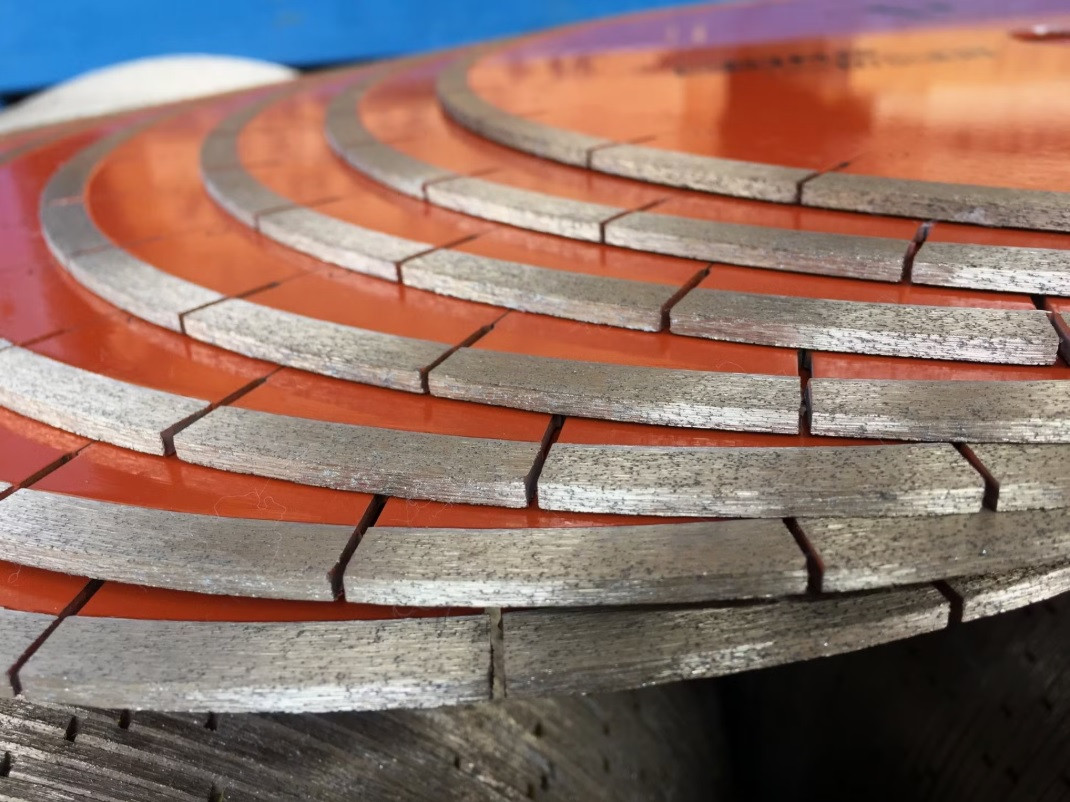
Not all diamond blades are created equal, and picking the right one makes a massive difference to your results. Segmented blades feature gaps between the diamond sections, allowing for faster cutting and better heat dissipation. They’re perfect for rough cuts on concrete and masonry but tend to leave a slightly rougher edge.
Continuous rim blades, on the other hand, have an unbroken edge that delivers ultra-smooth cuts. These are your go-to choice for ceramic tiles, porcelain, and glass where chipping is a concern. They cut more slowly but produce far cleaner results.
Turbo blades sit somewhere in the middle. Their serrated rim combines speed with a reasonably smooth finish. They’re versatile performers that work well across multiple materials, making them excellent all-rounders for your toolkit.
Which Diamond Blade Should I Use for Concrete, Tiles, or Stone?
For concrete and masonry, a segmented blade handles the job brilliantly. The aggressive cutting action powers through tough aggregate without overheating. When working with delicate ceramic or porcelain tiles, switch to a continuous rim blade to avoid those frustrating chips and cracks.
Natural stone like granite or marble requires a bit more thought. A turbo blade often works well for granite, whilst softer stones like limestone benefit from continuous rim blades. Always check the manufacturer’s recommendations for your specific material.
Essential Safety Precautions Before You Begin
Personal Protective Equipment You’ll Need
Safety isn’t optional when working with diamond blades. At minimum, you’ll need safety glasses or a full face shield to protect against flying debris. Ear protection is essential too—circular saws are incredibly loud, and prolonged exposure damages your hearing.
Heavy-duty gloves protect your hands during blade changes and material handling. A dust mask or respirator is non-negotiable, especially when cutting concrete or stone. The silica dust generated during these cuts can cause serious lung problems with repeated exposure.
How to Inspect Your Diamond Blade for Damage
Before every use, give your blade a thorough once-over. Look for missing diamond segments, cracks in the core, or signs of warping. Run your finger carefully along the edge to feel for irregularities or worn sections.
Check that the arbor hole matches your saw’s spindle size. A blade that doesn’t fit properly creates dangerous vibration and uneven cuts. If anything looks dodgy, replace the blade immediately—it’s simply not worth the risk.
Can Diamond Blades Shatter or Break During Use?
Yes, they absolutely can. Damaged blades, improper installation, or forcing the blade through material can cause catastrophic failure. Using a blade rated for a lower RPM than your saw produces is particularly dangerous.
Never remove blade guards or disable safety features. Keep your body positioned to the side of the cutting line, not directly behind it. If a blade does shatter, you want to be well clear of the trajectory.
Step-by-Step Guide: Installing a Diamond Blade on Your Circular Saw
Tools Required for Installation
Gather your tools before starting. You’ll need the blade wrench that came with your saw, possibly a spindle lock button, and your new diamond blade. Some saws require an Allen key instead of a standard wrench.
Have a clean cloth handy to wipe the arbor and flanges. Any debris caught between these surfaces causes wobble and uneven cutting. A pair of work gloves protects your hands during the process.
Removing the Existing Blade Safely
First things first—disconnect the power. Unplug corded saws or remove the battery from cordless models. Never trust the trigger lock alone; accidents happen when people get complacent.
Engage the spindle lock (if your saw has one) and use the wrench to loosen the arbor bolt. Remember, most circular saw arbor bolts have reverse threads—turn clockwise to loosen. Remove the outer flange and carefully lift out the old blade.
Mounting the Diamond Blade Correctly
Check the blade’s rotation direction—there’s usually an arrow printed on the blade that should match the saw’s cutting direction. Position the blade against the inner flange, making sure it seats flat without any gaps.
Replace the outer flange and thread the arbor bolt back in. Tighten by turning anti-clockwise until snug, then give it another quarter turn. Over-tightening can damage the blade or make future removal difficult.
How Tight Should a Diamond Blade Be on a Circular Saw?
The blade needs to be firm but not cranked down with excessive force. It should have zero lateral movement when you try to wobble it by hand. Too loose and it’ll vibrate dangerously; too tight and you risk cracking the blade core.
A good rule of thumb: tighten until the blade stops moving, then add just a bit more. The cutting action itself tends to tighten the bolt further, so you don’t need to go overboard.
Cutting Techniques for Best Results
Wet Cutting vs Dry Cutting: Which Is Better?
Wet cutting uses a continuous water stream to cool the blade and suppress dust. It extends blade life significantly and produces cleaner cuts. For heavy-duty concrete work or extended cutting sessions, wet cutting is the superior choice.
Dry cutting offers convenience and portability. You’re not dealing with water tanks, hoses, or cleaning up slurry. For quick jobs or when water isn’t practical, dry cutting works fine—just take regular breaks to let the blade cool.
How to Cut Stone and Tiles Without Chipping
The secret to chip-free cuts lies in your technique. Start with a shallow scoring pass at about 3mm depth before making your full cut. This establishes a clean edge that prevents chipping as you go deeper.
Support the material properly and never let the cut-off piece fall away unsupported. Use masking tape along your cut line for extra protection on particularly delicate tiles. Keep your feed rate slow and steady—rushing causes problems.
Achieving Clean Cuts on Concrete and Masonry
Mark your cut line clearly with chalk or a lumber crayon. For straight cuts, clamp a guide board to the surface. Start the saw before contacting the material and let the blade reach full speed.
Apply gentle forward pressure and let the blade do the work. Forcing the cut overheats the blade and produces poor results. For thick concrete, make multiple passes, increasing depth each time rather than attempting to cut through in one go.
Polishing Floor Tiles with Diamond Pads
Introduction to Diamond Polishing Pads
Once your tiles are cut and installed, diamond polishing pads bring them to life. These flexible discs contain diamond particles bonded to a resin backing. They’re designed for polishing floor tiles, benchtops, and stone surfaces to a brilliant shine.
Diamond pads attach to angle grinders or dedicated polishing machines via hook-and-loop backing. They’re available in various grits, from coarse material removal to ultra-fine finishing. The transformation they achieve is genuinely remarkable.
Best Diamond Polishing Pads for Stone and Tile Surfaces
Quality matters enormously with diamond polishing pads. The best diamond polishing pads feature evenly distributed diamond particles and durable resin bonds. Look for pads specifically designed for your material—granite pads differ from marble pads.
For diamond stone polishing pads, reputable brands offer consistent performance across their grit range. Cheap alternatives often shed diamonds quickly or produce uneven results. Investing in quality diamond pads saves money long-term through better durability and superior finishes.
Step-by-Step: How to Polish Tile Floors Like a Professional
Begin by cleaning the surface thoroughly. Attach your coarsest diamond pad and work systematically across the floor in overlapping passes. Keep the surface wet to prevent dust and overheating.
Progress through each grit level, never skipping grades. After each grit, clean the surface completely before moving to the next. The final pass with your finest pad reveals that mirror-like finish that makes all the effort worthwhile.
Diamond Pad Polishing: Grit Progression Explained
Diamond pad polishing follows a logical progression from coarse to fine. Starting grits around 50-100 remove scratches and level uneven surfaces. Medium grits (200-400) refine the surface and remove marks from previous grits.
Fine grits (800-1500) develop the shine, whilst ultra-fine grits (3000+) create that glass-like finish. Each stage builds on the previous, so patience during diamond pad polishing pays dividends in the final result.

Maintaining Your Diamond Blades and Pads
How Long Do Diamond Blades Last?
Blade lifespan varies dramatically based on material hardness, cutting technique, and blade quality. A premium blade cutting tiles might last through hundreds of cuts, whilst the same blade in abrasive concrete might manage far fewer.
Proper technique extends life significantly. Avoid forcing cuts, maintain appropriate speed, and use wet cutting when practical. Quality blades outlast budget options by substantial margins, often making them better value despite higher upfront costs.
Signs Your Diamond Blade Needs Replacing
Watch for slower cutting speeds, even with steady pressure. If the blade starts wandering from your cut line or producing rougher edges than usual, the diamonds are likely worn. Visible damage like missing segments or cracks means immediate replacement.
A blade that overheats quickly has probably lost cutting efficiency. When your diamond sanding disc or blade stops performing, fighting with it wastes time and risks damaging your workpiece.
Cleaning and Storing Diamond Sanding Pads
After use, rinse diamond sanding pads thoroughly to remove debris. Allow them to dry completely before storage to prevent mould or degradation. Store flat in a dry location away from direct sunlight.
Keep pads organised by grit for easy access during projects. Proper care of your diamond sanding pads extends their useful life considerably.
Choosing Quality Diamond Tools for Your Projects
What to Look for When Buying Diamond Stone Polishing Pads
Check the diamond concentration and bond type. Higher diamond concentration typically means longer life but higher cost. The bond hardness should match your material—harder bonds for softer materials and vice versa.
Read reviews from users working with similar materials. Reputable suppliers provide detailed specifications and usage guidelines. Don’t be afraid to ask questions before purchasing.
Are Expensive Diamond Pads Worth the Investment?
Generally speaking, yes. Premium diamond pads maintain their cutting ability longer, produce more consistent results, and often work out cheaper per square metre polished. They’re also safer, as quality control standards are typically higher.
That said, for occasional use, mid-range options offer reasonable value. Assess your needs honestly—professionals should invest in top-tier diamond polish pad products, whilst occasional DIYers might find mid-range perfectly adequate.
Conclusion: Getting Professional Results Every Time
Diamond blade for circular saw and pads have transformed what’s achievable for both professionals and DIY enthusiasts. Understanding blade types, proper installation, and correct cutting techniques sets the foundation for excellent results. Safety remains paramount throughout—never compromise on protective equipment or blade inspection.
The polishing process deserves equal attention. Quality diamond polishing pads, proper grit progression, and patient technique produce stunning finishes on floor tiles and stone surfaces. Maintaining your tools through proper cleaning and storage protects your investment and ensures consistent performance.
Whether you’re polishing floor tiles in your bathroom renovation or cutting concrete for a new patio, the principles remain consistent. Take your time, use the right tools for each job, and let quality diamond products do the heavy lifting. Your projects will reflect the care and knowledge you bring to them, delivering results you’ll be genuinely proud of. Now get out there and create something brilliant!


Leave a comment